Festive Unique Adorable

Crochet Spiral Santa Ornament

β†˜ Jump to Pattern
Crochet Spiral Santa Ornament πŸ“Œ Pin it
5.0β˜…Rating
2–3 HoursTime to Make
βœ‚οΈ

Intermediate Level

Perfect for crocheters familiar with amigurumi basics, color changes, and crocheting in the round.

⏱️

Afternoon Project

Takes just a few hours to whip up, making it an excellent weekend craft for the holiday season.

πŸŽ„

Festive Decor

Designed to hang gracefully from your tree, mantle, or window to catch the holiday spirit.

About This Crochet Spiral Santa Ornament

Bring a touch of whimsical holiday magic to your home with this adorable Crochet Spiral Santa! Combining classic amigurumi design with a playful, curly wind-spinner tail, this little Santa is sure to be a standout piece in your festive decor.

Whether you are looking to create a unique handmade ornament for your Christmas tree or a fun decorative pull for a nursery or living room, this spiral Santa is both fun to make and delightful to display.
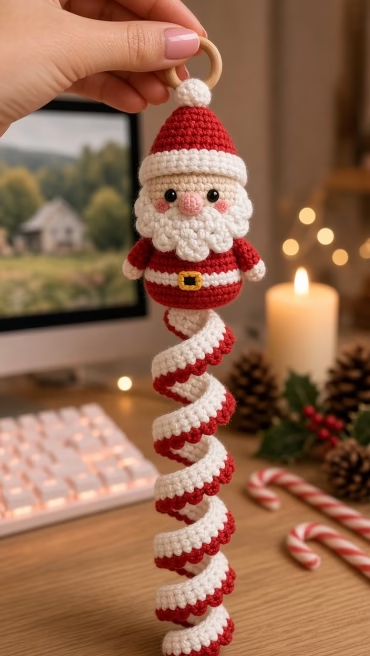
Crochet Spiral Santa Ornament detail πŸ“Œ Pin it

Why You'll Love This Crochet Spiral Santa Ornament

I absolutely love how the spiral tail adds movement and playfulness to a traditional Santa design. The satisfying curl of the spiral works up like magic, and adding those tiny detailsβ€”like his little bobble beard and golden belt buckleβ€”brings his whole personality to life. It’s one of those projects that guarantees a smile every time you look at it.

Switch Things Up

You can easily customize the length of the spiral by adding or subtracting starting chains. Try making a super-long spiral to hang in a doorway! You can also swap the traditional red and white for pastel colors for a modern, whimsical holiday theme.

For a different texture, try using a fluffy velvet yarn for the hat brim and pom-pom instead of standard cotton or acrylic.

Common Mistakes & How to Fix Them

Losing count of stitches on the spiral: Because you are putting multiple stitches in each chain, the stitch count grows rapidly. Take it slow to ensure an even curl.
Overstuffing the head and body: Stuff firmly, but not so much that the stitches stretch and show the filling.
Sewing the spiral off-center: Make sure you pin the spiral exactly to the center bottom of Santa's body so he hangs straight.

Where to Hang Your Spinner

These wind spinners look fantastic hanging from Christmas tree branches, but they also look wonderful suspended from mantlepieces, stair garlands, or near heating vents where the subtle air flow will make them spin gracefully.

FREE CROCHET PATTERN

Crochet Spiral Santa Ornament

A delightful two-part project: an amigurumi Santa head and torso, attached to a mesmerizing two-tone curly spiral tail.

Intermediate 2–3 Hours πŸ“ Approximately 12 inches (30 cm) long from wooden ring to the bottom of the spiral (un-stretched). 🧡 Gauge is not critical for this project, just ensure your stitches are tight enough that stuffing doesn't show through.

Materials Needed for Crochet Spiral Santa Ornament

β€” Main Fabric

01Light-weight (DK) Cotton Yarn β€” 50 g, Red
02Light-weight (DK) Cotton Yarn β€” 50 g, White
03Light-weight (DK) Cotton Yarn β€” 20 g, Beige/Peach
04Light-weight (DK) Cotton Yarn β€” Scrap, Black and Yellow (for belt)
05Light-weight (DK) Cotton Yarn β€” Scrap, Pink (for nose and cheeks)
06Safety Eyes β€” 2, Black (6mm)
07Toy Stuffing β€” 1, White
08Small Wooden Ring β€” 1, Natural

β€” Tools Required

012.5mm Crochet hook
02Yarn needle
03Scissors
04Stitch marker
05Pins

Progress Tracker

0% Complete

β€” Overview & Gauge

Info :The body and head are worked as one piece starting from the bottom up.
Info :The spiral is worked separately and sewn to the bottom of the body.
Info :Use a stitch marker to mark the beginning of each round when working the body and head in continuous spirals.

Tips & Notes

πŸ’‘ If your spiral isn't curling enough, you can twist it around your finger into shape, and it will retain its memory.
πŸ’‘ Use a bit of blush or pink eyeshadow applied with a Q-tip for rosy cheeks instead of pink yarn for a softer look.

STEP-BY-STEP

The Free Pattern

β€” Head and Body β€”

Info :Start with Red yarn to create the body from the bottom up.

Round 1 :

6 sc in mr (6)

Round 2 :

6 inc (12)

Round 3 :

[1 sc, inc] x 6 (18)

Round 4 :

[2 sc, inc] x 6 (24)

Round 5 :

[3 sc, inc] x 6 (30)

Round 6 :

[4 sc, inc] x 6 (36)

Rounds 7-9 :

sc in each st around (36)
Info :Change to White yarn for the belt.

Round 10 :

sc in each st around (36)
Info :Change back to Red yarn.

Round 11 :

sc in each st around (36)

Round 12 :

[4 sc, dec] x 6 (30)

Round 13 :

[3 sc, dec] x 6 (24)

Round 14 :

[2 sc, dec] x 6 (18)
Info :Stuff the body firmly. Change to Beige yarn for the head.

Round 15 :

[2 sc, inc] x 6 in BLO (24)

Round 16 :

[3 sc, inc] x 6 (30)

Round 17 :

[4 sc, inc] x 6 (36)

Rounds 18-23 :

sc in each st around (36)
Info :Insert safety eyes between Rounds 20 and 21, about 6 stitches apart. Embroider yellow buckle on the white belt.

Round 24 :

[4 sc, dec] x 6 (30)

Round 25 :

[3 sc, dec] x 6 (24)

Round 26 :

[2 sc, dec] x 6 (18)
Info :Stuff the head firmly.

Round 27 :

[1 sc, dec] x 6 (12)

Round 28 :

6 dec (6). Fasten off and weave in end.

β€” Hat β€”

Info :Using Red yarn.

Round 1 :

4 sc in mr (4)

Round 2 :

[1 sc, inc] x 2 (6)

Round 3 :

[2 sc, inc] x 2 (8)

Round 4 :

[3 sc, inc] x 2 (10)

Round 5 :

[4 sc, inc] x 2 (12)

Round 6 :

[1 sc, inc] x 6 (18)

Round 7 :

sc in each st around (18)

Round 8 :

[2 sc, inc] x 6 (24)

Round 9 :

[3 sc, inc] x 6 (30)

Round 10 :

[4 sc, inc] x 6 (36)

Rounds 11-13 :

sc in each st around (36)
Info :Change to White yarn for the brim.

Round 14 :

sc in each st around (36)

Round 15 :

sl st in each st around (36). Fasten off, leaving a long tail for sewing.

β€” Beard β€”

Info :Using White yarn. This piece is worked back and forth in rows.

Row 1 :

Ch 15, sc in 2nd ch from hook and each ch across (14), turn.

Row 2 :

Ch 1, [bo in next st, sc in next st] x 7 (14). Fasten off, leave tail for sewing.

β€” Arms (Make 2) β€”

Info :Start with Beige yarn.

Round 1 :

5 sc in mr (5)
Info :Change to Red yarn.

Rounds 2-5 :

sc in each st around (5). Fasten off, leaving tail for sewing. Do not stuff.

β€” Nose and Pom-pom β€”

Info :Nose (Pink yarn): 6 sc in mr, sl st to join. Fasten off and leave tail for sewing.
Info :Pom-pom (White yarn): 6 sc in mr. Round 2: 6 inc (12). Round 3: 6 dec (6). Fasten off, stuff slightly, leave tail for sewing.

β€” Spiral Tail β€”

Info :Using White yarn.

Row 1 :

Ch 50 (or desired length).

Row 2 :

3 dc in 3rd ch from hook, and 3 dc in every ch across. The piece will naturally spiral. Fasten off White.
Info :Join Red yarn to the beginning of the spiral edge.

Row 3 :

sc in each st along the outer edge of the spiral. Fasten off, weave in ends.

FINISHING UP

Assembly Instructions

Now it’s time to bring your little Santa to life!

Sew the beard to the face, curving it right below the safety eyes.
Sew the pink nose in the center of the face, partially overlapping the top of the beard. Embroider little pink cheeks if desired.
Stuff the red hat lightly. Sew it to the top of the head at a slight angle.
Sew the white pom-pom to the top tip of the hat.
Attach the arms to the sides of the body, right where the red body meets the beige head.
Sew the flat top end of the spiral securely to the bottom center of the red body.
Use a strong piece of yarn or thread to attach the wooden ring to the very top of Santa's hat for hanging.

Important Notes

Take your time when working the spiral! The 3 double crochets in each chain can be tedious, but it creates the perfect springy bounce.
When attaching the wooden ring, loop the yarn through a few times to ensure it can hold the weight of the ornament securely.

FAQs

You ask,
we answer.

Can I use acrylic yarn instead of cotton?

Yes, acrylic yarn works perfectly fine! Cotton just gives the amigurumi a slightly smoother, more defined stitch definition, but acrylic will be wonderfully soft and vibrant.

How do I make the spiral longer?

Simply increase your starting chain for the spiral. Just remember that every extra chain means 3 more double crochet stitches!

Made it? Share your crochet!

Save this pattern, send it to a crochet friend, and come back for more handmade ideas.